Creating and Managing Membership Types

Define the plans you offer your members. Learn how to create a membership type from scratch, set pricing and billing cycles, add discount coupons, configure sign-up questions, customize the welcome email, and manage approval and upgrade settings.

5 min read

Membership Types are the plans you offer to your members. Each type defines its own pricing, billing cycle, branding, payment methods, questions, and approval settings. You can create as many membership types as you need, for example a monthly plan, an annual plan, or a lifetime membership.To access Membership Types, go to Membership in the left sidebar and click Membership Types.

Creating a Membership Type

Click + Create Type in the top right corner to open the membership type builder. The builder walks you through each step one at a time with a live preview on the right so you can see how your membership page will look to members as you build it.

Step 1: Membership Title

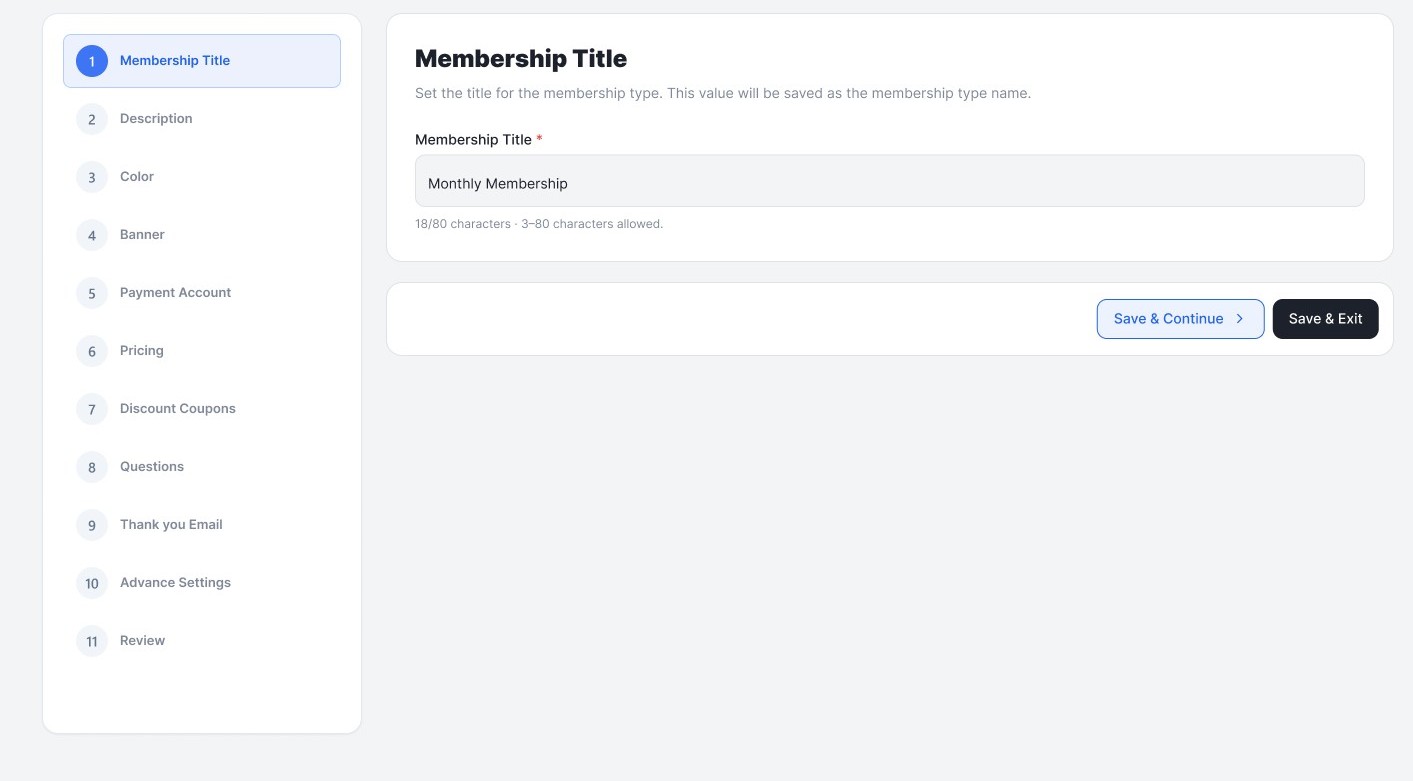
Enter a name for your membership type, for example “Monthly Membership” or “Annual Supporter.” This is the name members will see on the sign-up page. The title must be between 3 and 80 characters.

Step 1 of Member Type Creation
Step 1: Write Membership Title

Step 2: Description

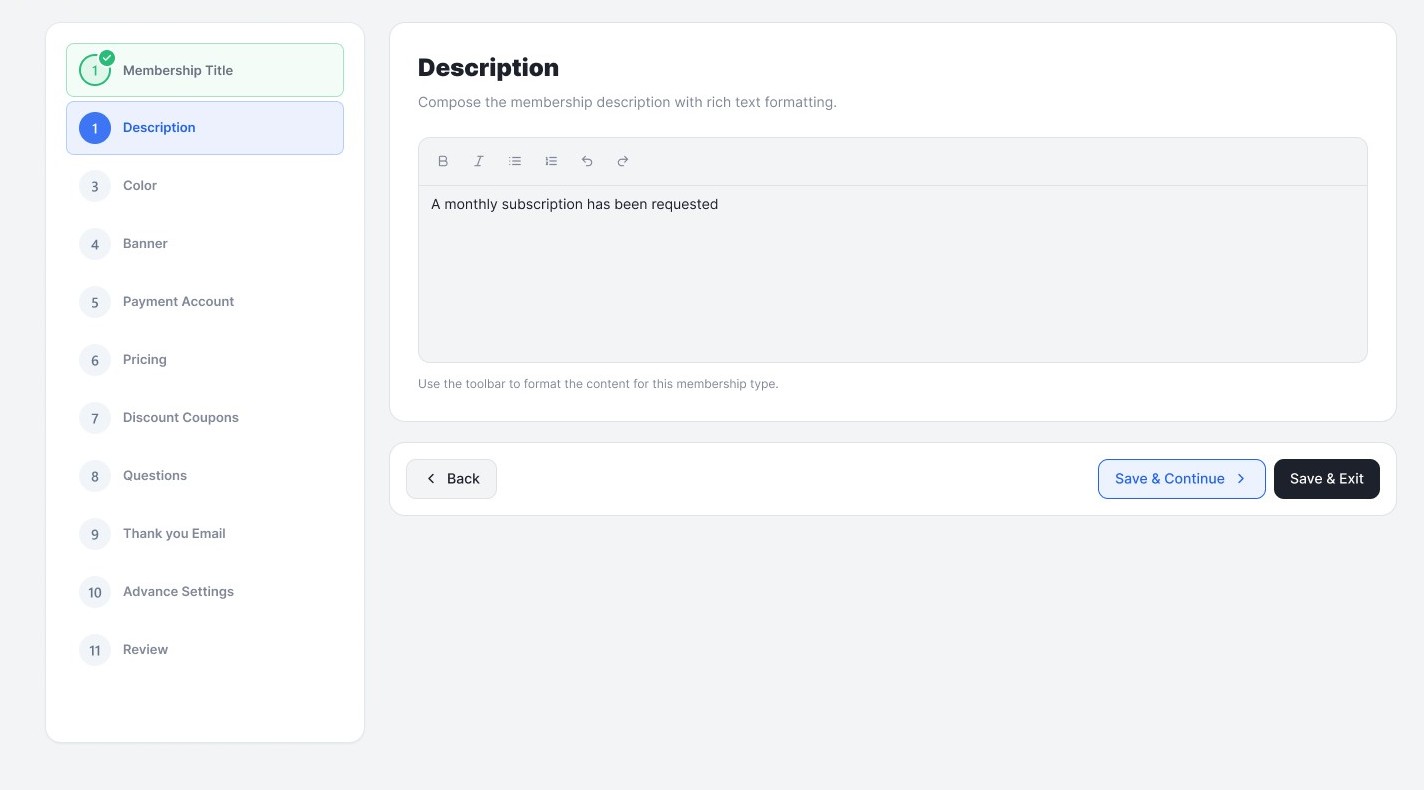
Write a description explaining what this membership includes and who it is for. You can use the rich text editor to format the content, or use the built in AI generator by typing /ai in the editor to create a description instantly.

Step 2 of Member Type Creation
Step 2: Write the Membership Description

Step 3: Color

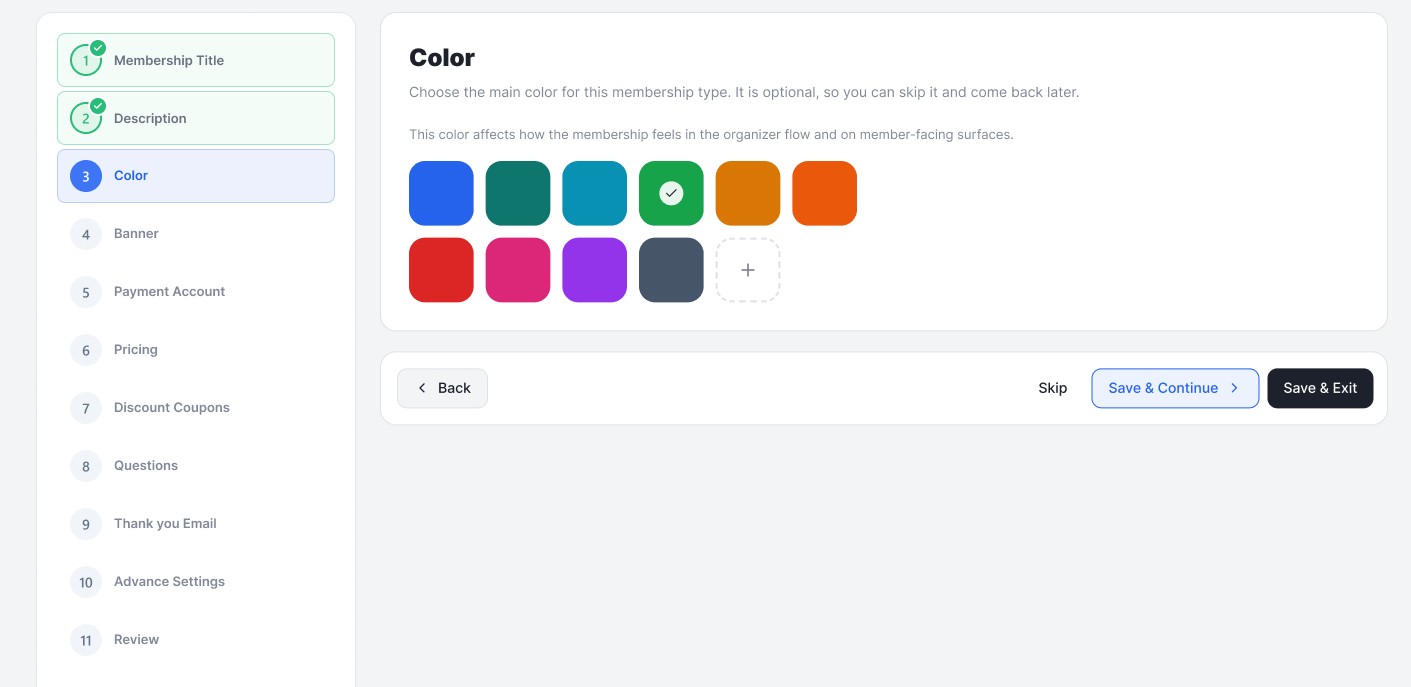
Choose a theme color for your membership type. This color will appear on the membership card and registration page to help visually distinguish it from other membership types you offer.

Step 3 of Member Type Creation
Step 3: Choose Color Theme of the Membership Type

Step 4: Upload Banner

Add a banner image for your membership type. You have three options:

  • Drag and Drop — Upload your own image directly.
  • Generate Using AI — Describe the image you want and the AI will create a custom banner for you.
  • Stock Images — Choose from a curated collection of images organized by category such as Community, Education, Healthcare, Environment, and Food Relief.

Step 5: Payment Account

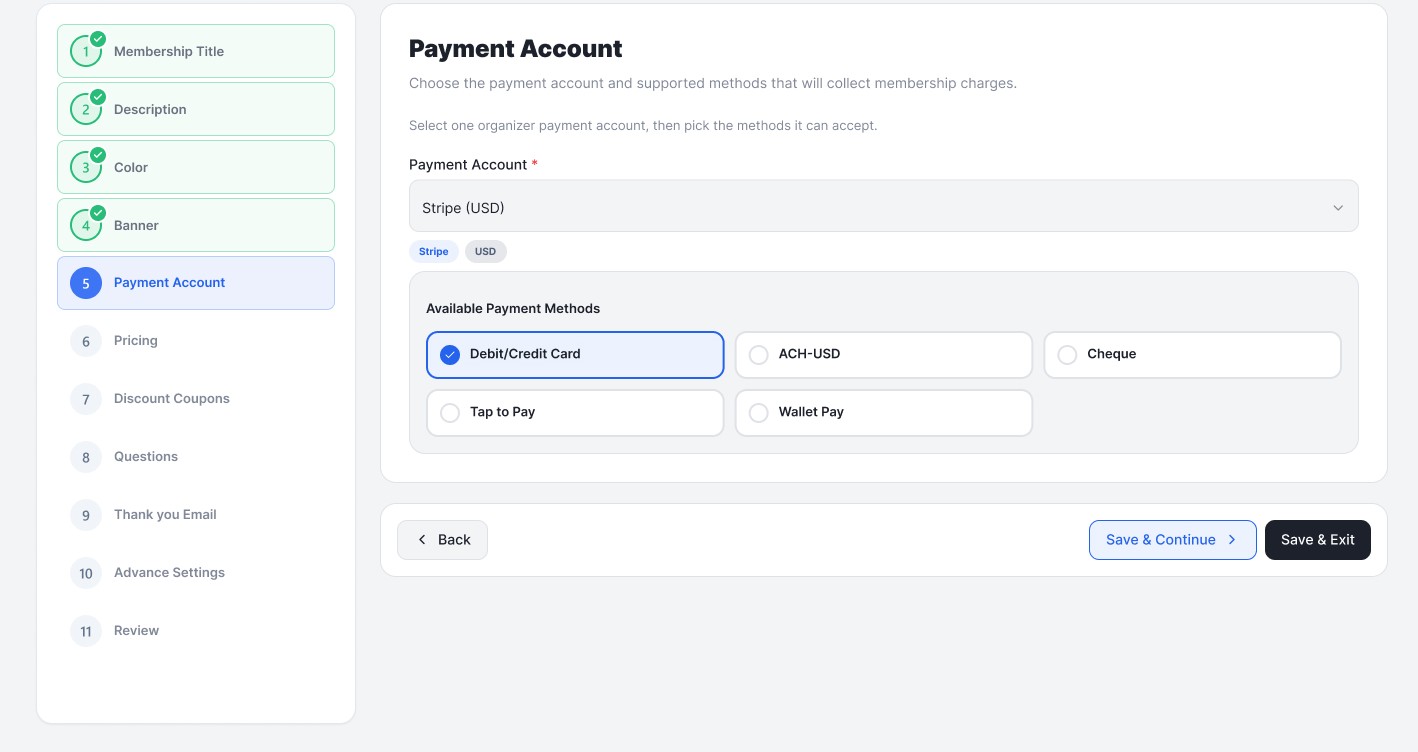
Select the payment account that will collect membership charges and choose which payment methods members can use:

  • Debit and Credit Card
  • Apple and Google Pay
Step 5 of Member Type Creation
Step 5: Set Payment Type for the Membership Type

Step 6: Pricing

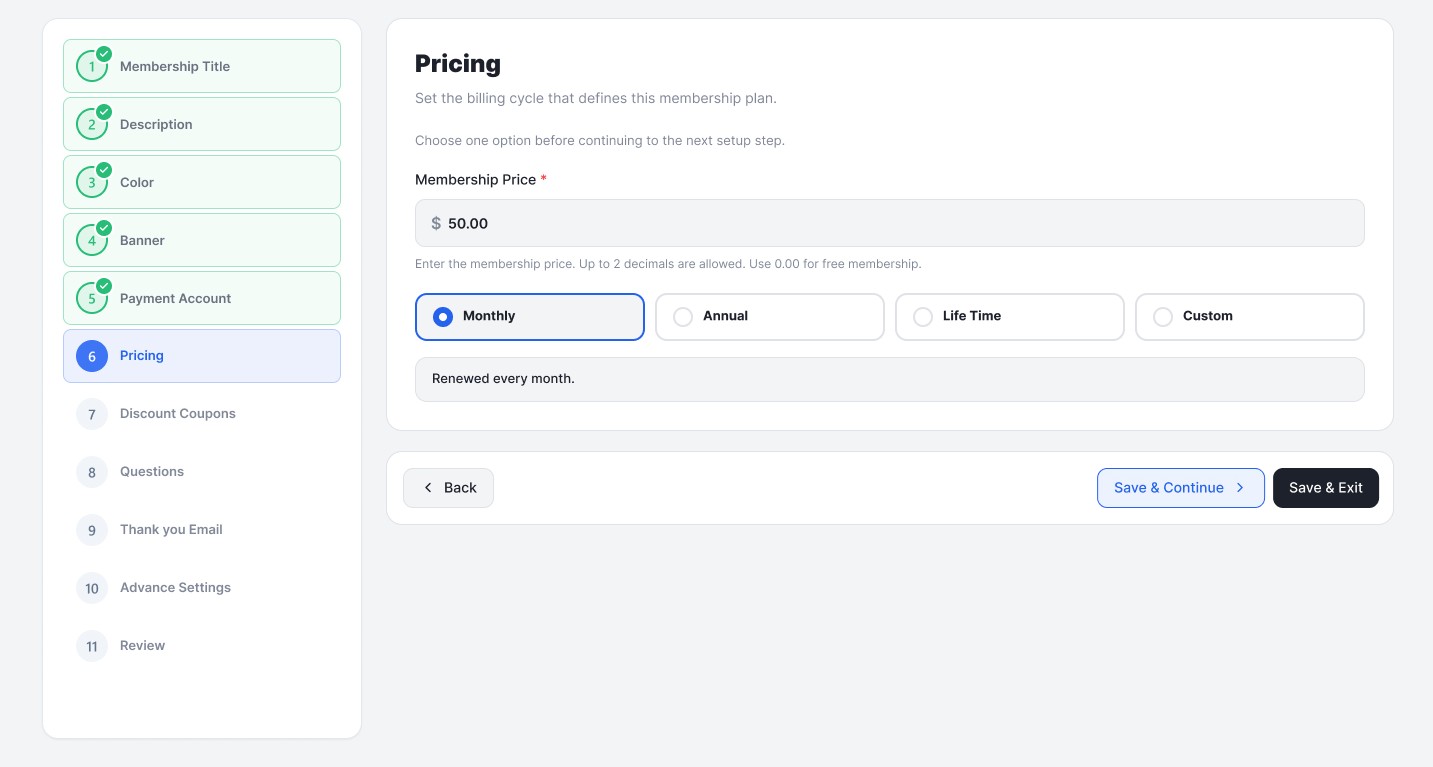
Set the membership price and billing cycle. Enter the membership price and select one of the following billing frequencies:

  • Monthly — Renewed every month.
  • Annual — Renewed every year.
  • Life Time — A one time charge with no renewal.
  • Custom — Define your own billing cycle.

To offer a free membership, enter 0.00 as the price.

Step 6 of Member Type Creation
Step 6: Set Pricing for the Membership Type

Step 7: Discount Coupons

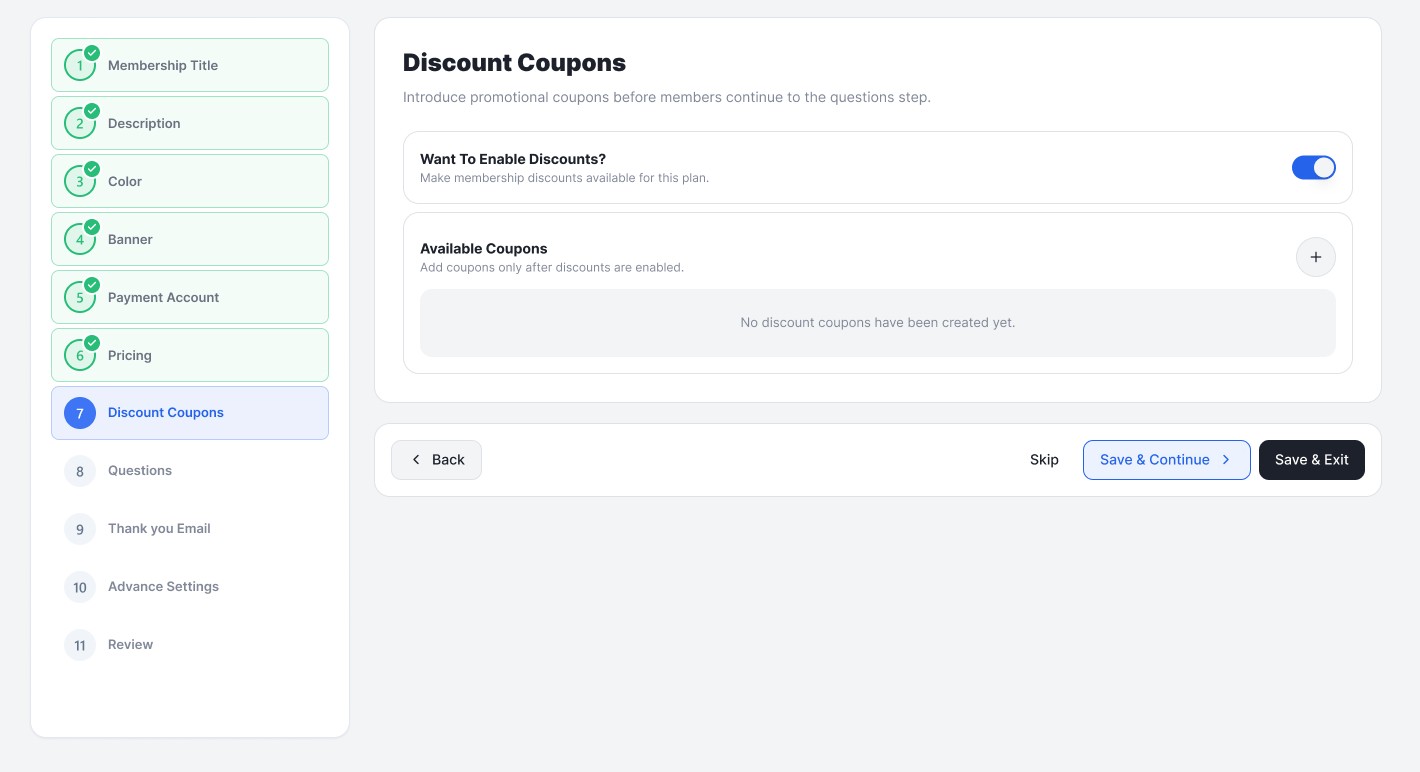
You can create promotional discount coupons for this membership type. Enable discounts and then click Add Coupon to create one. For each coupon you can set:

  • Code — Enter a code manually or click Generate Random Code to create one automatically.
  • Type — Choose between a fixed amount discount or a percentage discount.
  • Value — The discount amount or percentage.
  • Max Discount — Available for percentage discounts to cap the maximum saving.
  • Total Coupons — The total number of times this coupon can be used.
  • Is Active — Toggle to make the coupon available or unavailable.
Step 7 of Member Type Creation
Step 7: Set Discount Coupons for the Membership Type

Step 8: Questions

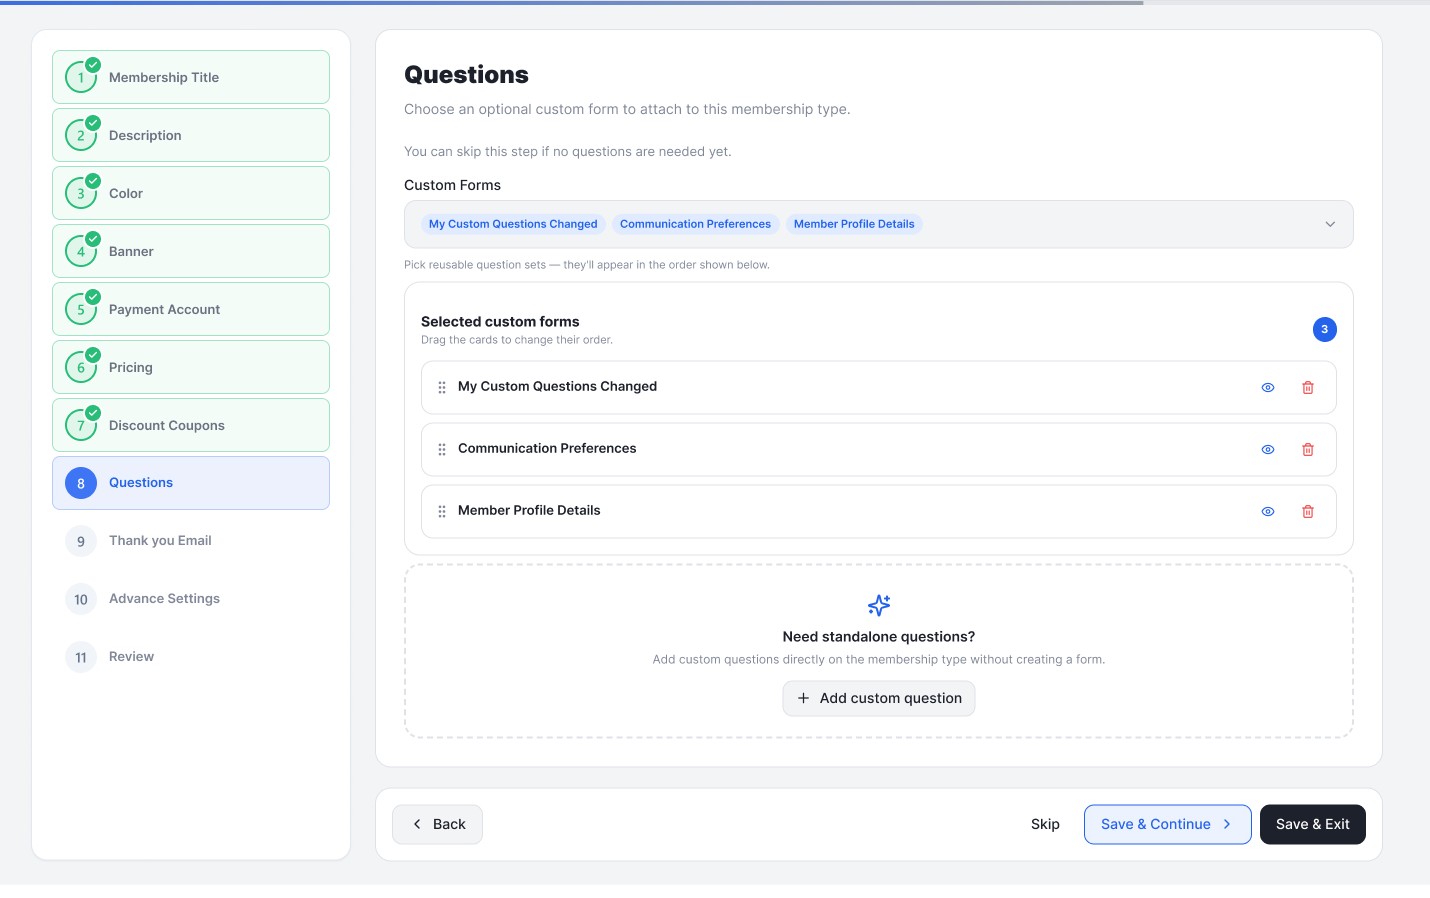
Attach a custom form to this membership type to collect additional information from members during sign-up. You can select an existing custom form from the dropdown or add standalone custom questions directly on this step. Questions can be set as required and configured with multiple options. Learn more about Custom Forms.

Step 8 of Member Type Creation
Step 8: Set Questions for members

Step 9: Welcome Email

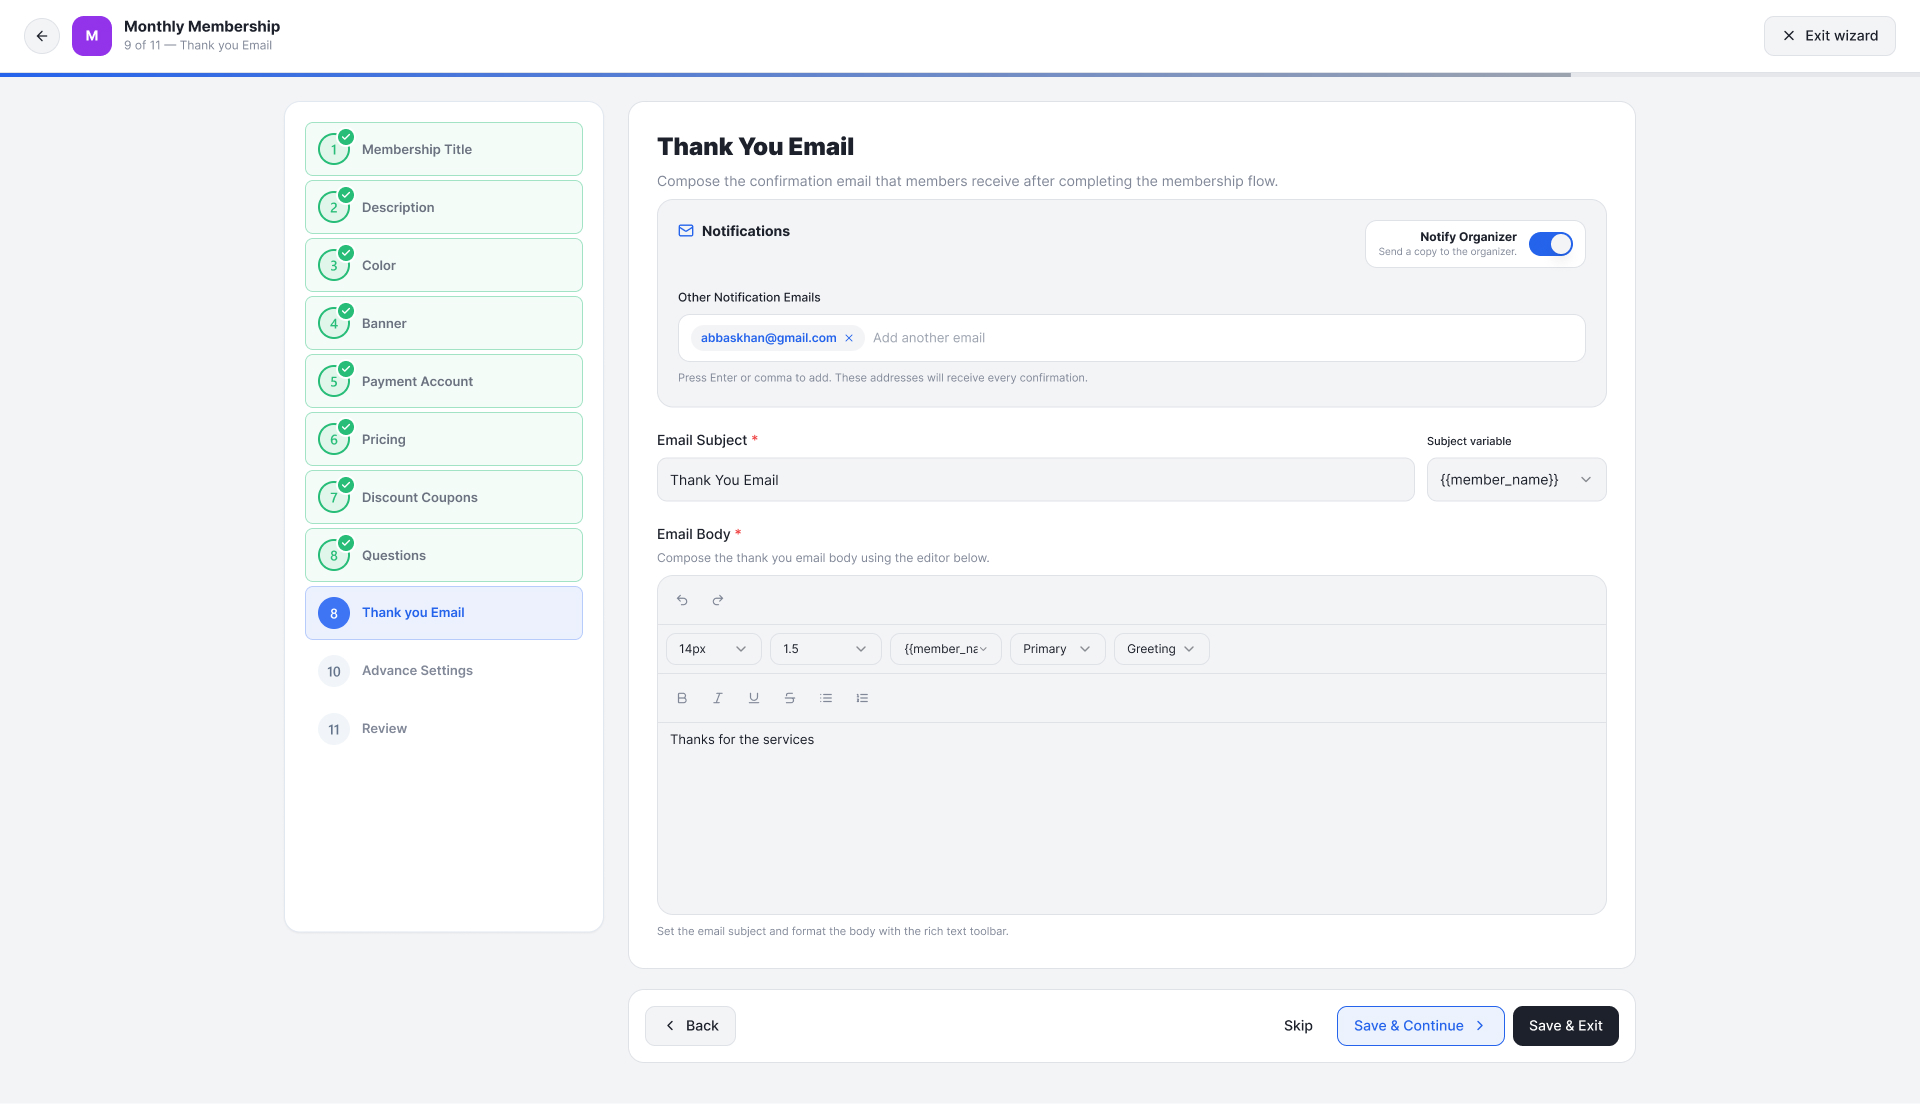
Customize the email members receive when they successfully join. You can:

  • Toggle Notify Organizer to receive a copy of each welcome email.
  • Add additional recipient email addresses to be notified of new sign-ups.
  • Edit the Email Subject and use variables such as First Name to personalize it.
  • Write a custom message in the email body. The email begins with a default template and you can add your own message after it.
Step 9 of Member Type Creation
Step 9: Set Thank You Email for Members

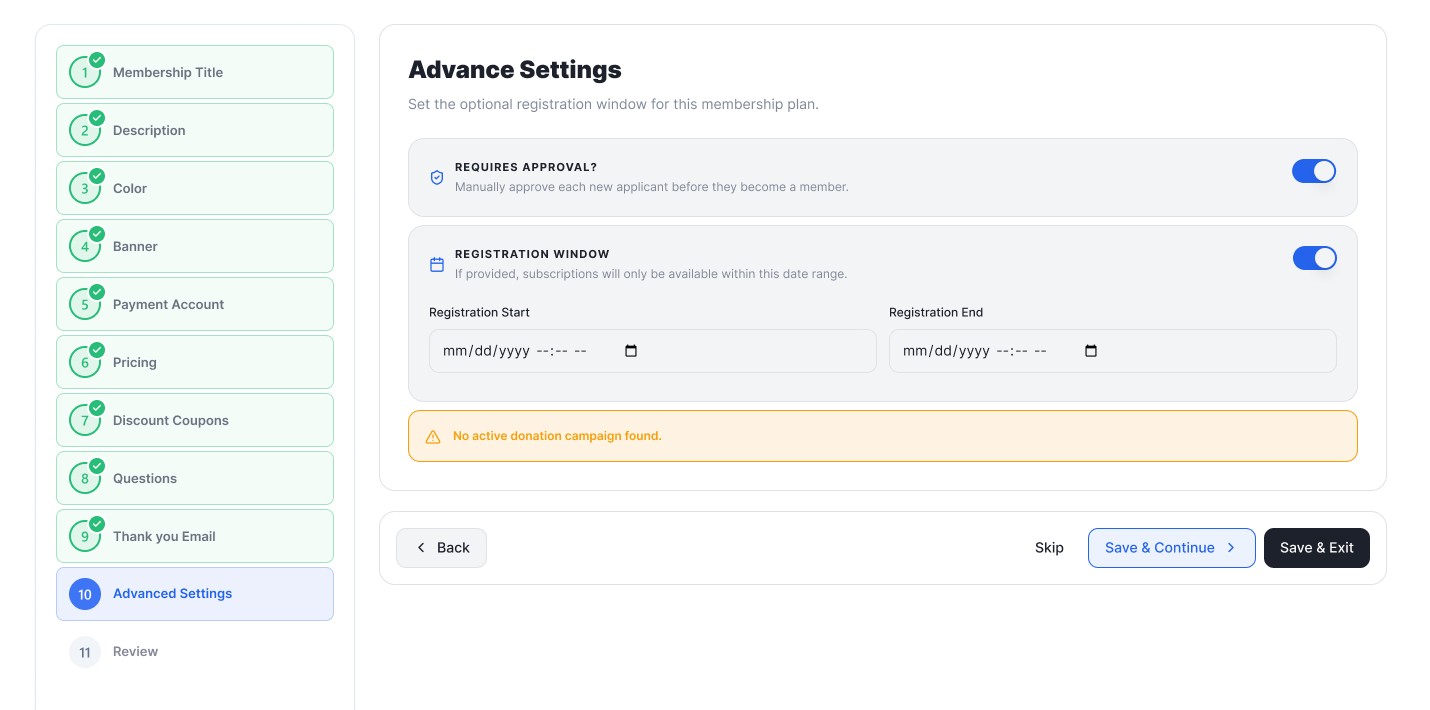
Step 10: Settings

Configure additional options for this membership type:

  • Requires Approval — When enabled, each new applicant must be manually approved before becoming an active member.
  • Registration Window — When enabled, sign-ups will only be available within a specific date range you define.
  • Membership Upgrade Paths — Configure which membership types a member can upgrade to from this one, and set the charge rule for the upgrade. Options include Full Price or a Fixed Upgrade Amount. You can also require approval for upgrades.
Step 10 of Member Type Creation
Step 10: Advance Membership Settings

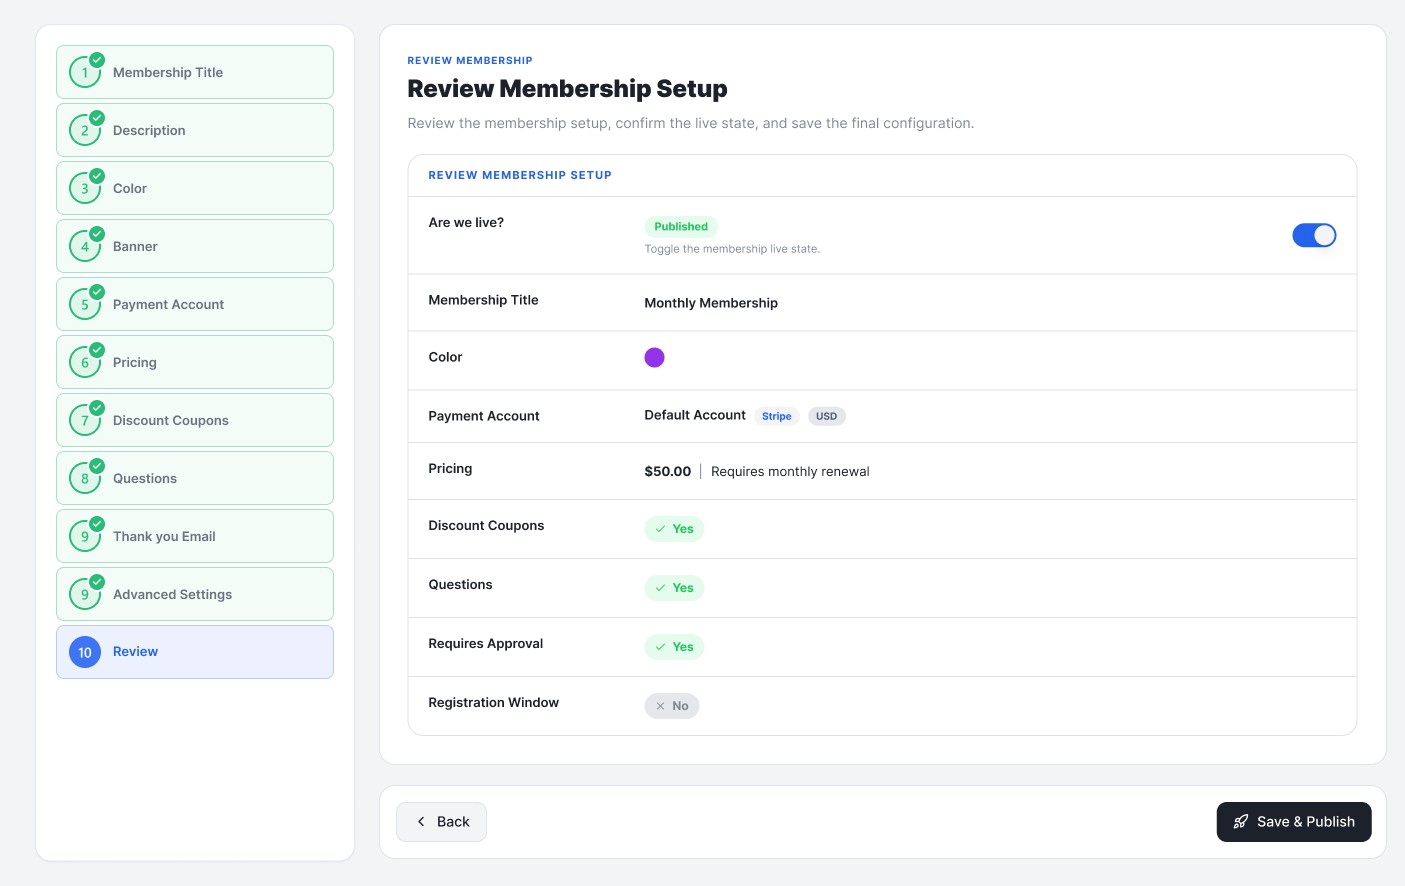
Step 11: Review and Publish

Review a summary of your membership type before publishing. You can confirm or adjust:

  • Whether the membership is live and open for sign-up.
  • Membership title, color, and payment account.
  • Pricing and billing cycle.
  • Whether discount coupons, questions, approval, and registration window are enabled.

Toggle Are we live? to publish the membership and make it available for sign-up, or leave it off to save it as a draft until you are ready.

Step 11 of Member Type Creation
Step 11: Review of Membership Status

Managing Membership Types

From the Membership Types list, click the three dot menu on any membership type to access the following options:

  • Members — View active members enrolled in this type, copy the sign-up link, or add a member manually.
  • Status — Switch the membership between Online (open for sign-up) and Offline (closed for sign-up) without deleting it.
  • Edit — Return to the builder to update any settings.
  • Delete — Permanently remove the membership type.
Go to Top