

Setting Up Your Payment Account
Set up your payment account by connecting Stripe through your Ideali Organizer Dashboard to start receiving donations.
- Log in to your Ideali Organizer Dashboard
- Go to Settings
- Click Payment Account
- Select Add
- Enter an account name and select your currency and then click on Connect with Stripe.
- You will be redirected to login into your Stripe Account.
- Connect your Stripe account (the secret key and publishable key will be filled in automatically)
- Click on Create Payment Account.
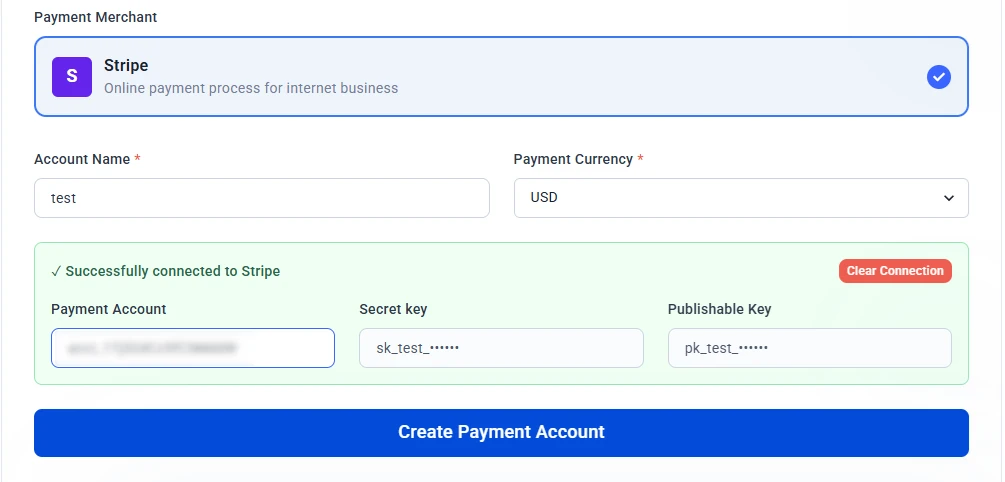
Once connected, you can start receiving donations directly through your campaigns.
Using Multiple Payment Accounts
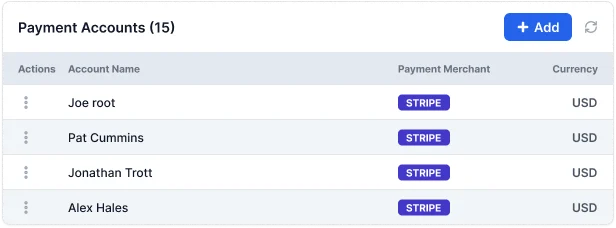
You are not limited to a single payment account. You can connect multiple payment accounts to your organization, for example if you run campaigns in different currencies or want to keep certain fundraising programs separated for accounting purposes.
When creating or updating a campaign, you will be able to select which available payment account that campaign should use. This means different campaigns can route donations to different accounts depending on your needs.
Preset donation amounts, fixed & recurring
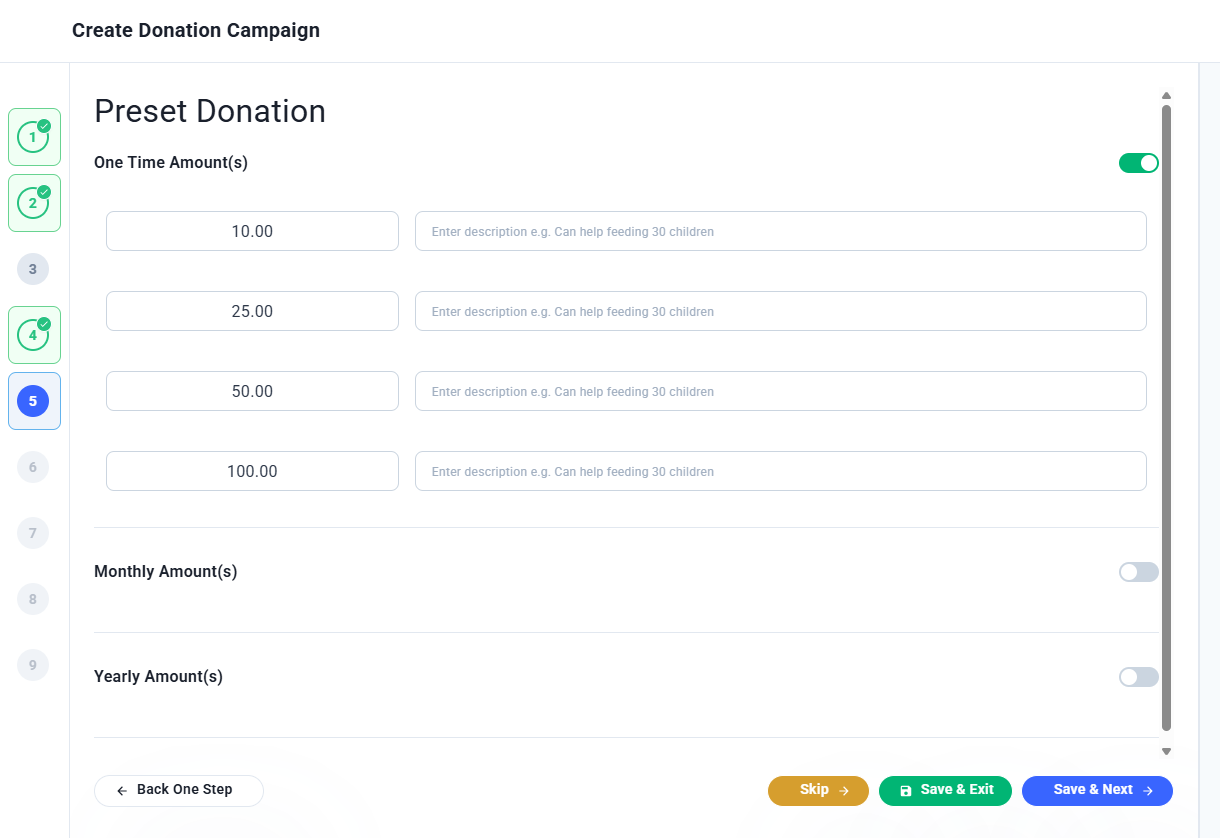
Set up suggested donation amounts for one time, monthly, and yearly giving on your Ideali campaign page to guide donors and encourage higher contributions.
📹 Watch: Set the Recurring Amount ⏱ 1m 17s
One Time Amounts
These are suggested amounts for donors who want to make a single contribution. Common starting points are $10, $25, $50, and $100 but you can set any amounts that make sense for your cause.
Monthly Amounts
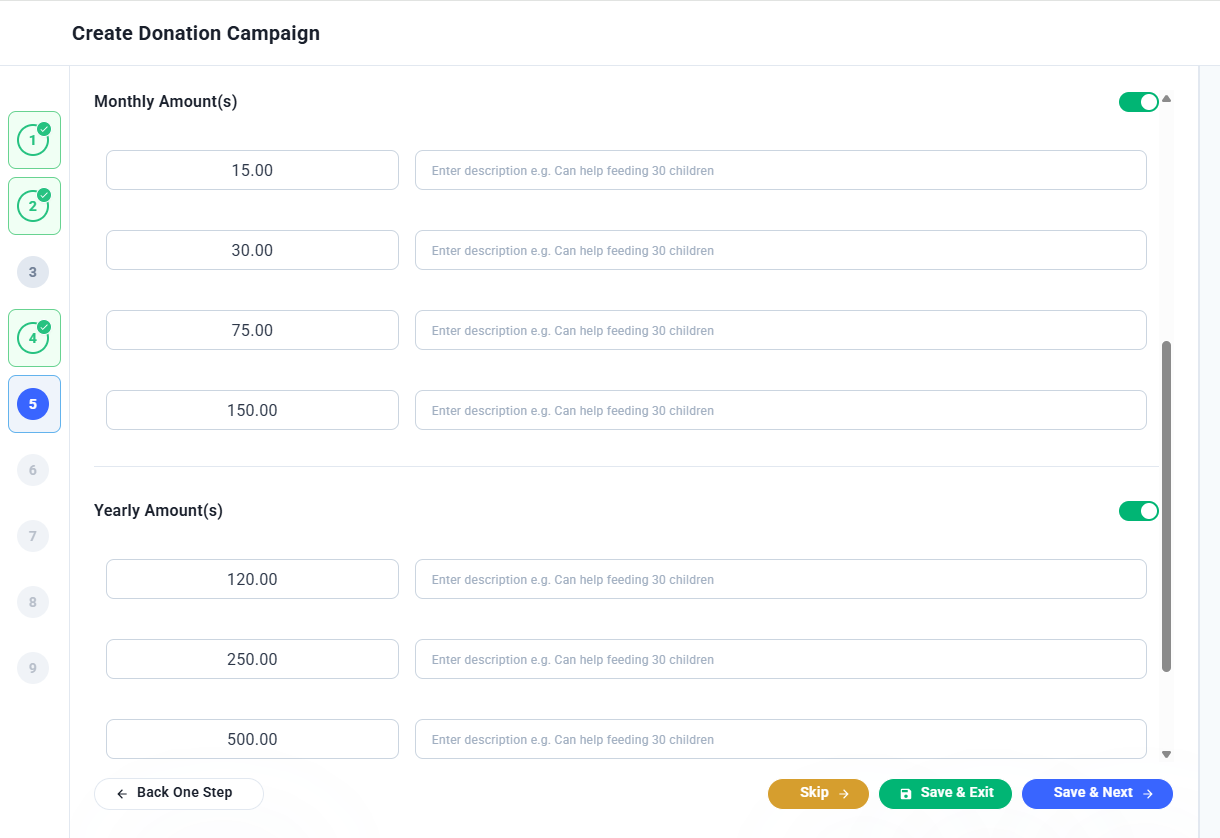
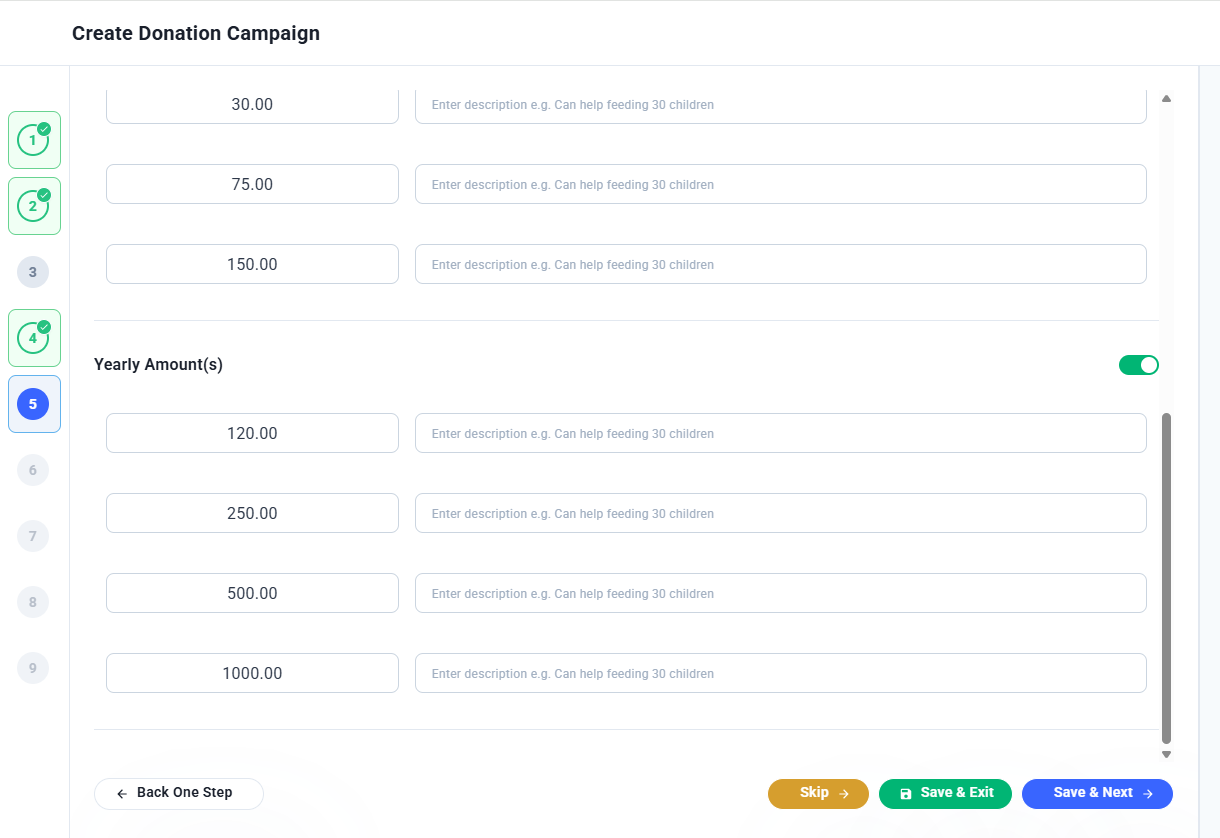
These are suggested amounts for donors who want to give on a recurring monthly basis. Monthly giving builds a reliable stream of support for your organization. Common starting points are $15, $30, and $75.
Yearly Amounts
These are suggested amounts for donors who want to commit to an annual contribution. Yearly donors tend to be your most loyal supporters. Common starting points are $120, $250, $500, and $1,000.
Adding Impact Descriptions
Next to each preset amount you can add a short description that shows donors what their contribution will achieve, for example “Can help feed 30 children.” Impact descriptions make giving feel more meaningful and personal and can significantly increase the likelihood of a donor choosing a higher amount.
Viewing and filtering payments
View, filter, and export all donation transactions across your campaigns from the Payments section, or drill into a single campaign's payment list directly from the Campaigns page.
The Payments section gives you a full view of all donation transactions across your campaigns in one place. You can access it by going to Donation in the left sidebar and clicking Payments.
Viewing All Campaign Payments
By default the payments page shows transactions from all your campaigns combined. Use the Select Campaign dropdown at the top to filter the view to a specific campaign if you want to focus on one fundraiser at a time.
📹 Watch: Check The Payment Report ⏱ 26s
Filtering by Status
Use the Filter dropdown to narrow down payments by sync status or payment status.
Sync status:
- All — Shows every transaction regardless of sync status.
- Synced — Shows payments that have been synced to a connected integration such as QuickBooks.
- Not Synced — Shows payments that have not yet been synced.
Payment status:
- Pending Payment — The donation has been initiated but not yet completed.
- Partially Paid — A partial amount has been received.
- Paid — The donation has been successfully processed and received.
- Cancelled — The transaction was cancelled before completion.
- Refund — The donation has been refunded to the donor.
- Adjusted in System — The payment record has been manually adjusted.
Exporting Payment Records
Use the export buttons at the top right of the page to download your payment records. You can export as a PDF or spreadsheet for your records or accounting purposes.
Payment methods accepted on Ideali
Learn about the three payment methods available to donors on Ideali including debit and credit card, ACH bank transfer, and check or cheque, and how to enable them on your campaign.
When you set up a payment account for your campaign, you can choose which payment methods donors can use to contribute. Ideali supports three payment methods through Stripe.
Debit and Credit Card
Donors can pay using any major debit or credit card. This is the most common payment method and is available to donors worldwide.
ACH USD
ACH is a bank to bank transfer method available to donors with a US bank account. It is a popular option for larger donations as it typically carries lower transaction fees than card payments.
Check or Cheque
Donors can contribute by sending a physical check or cheque. This option is suitable for donors who prefer traditional payment methods or do not have access to digital payment options.
Choosing Your Payment Methods
You can enable or disable each payment method individually when setting up your campaign. Go to Step 4 of the campaign builder, select your payment account, and check or uncheck the payment methods you want to offer. You can update these at any time by editing your campaign.
Why payments fail and how to fix them
Learn the most common reasons donation payments fail on Ideali and what donors and organizers can do to resolve them quickly.
Occasionally a donation may fail to process. This can happen for a number of reasons and is usually straightforward to resolve. Understanding the most common causes can help you assist donors and prevent issues from recurring.
Common Reasons a Payment Fails
- Insufficient funds — The donor’s account did not have enough balance to cover the donation amount. The donor should check their account balance and try again with a different card or a smaller amount.
- Card declined by the bank — Banks sometimes decline transactions for security reasons, especially for new or unusual purchases. The donor should contact their bank to authorize the transaction or use a different payment method.
- Incorrect card details — If the donor enters the wrong card number, expiry date, CVV, or billing address the payment will be declined. The donor should double check their card information and try again.
- Expired card — A payment will fail if the card used has passed its expiry date. The donor should use a current card.
- Card not supported — Some prepaid cards or cards from certain regions may not be supported by Stripe. The donor should try a different card or use ACH if they have a US bank account.
- Network or connection error — A temporary internet connection issue during checkout can interrupt the payment. The donor should check their connection and try again.
- Stripe account issue — If there is an issue with your connected Stripe account such as incomplete verification or a suspended account, all payments through your campaigns may fail. Check your Stripe dashboard for any alerts or actions required.
What to Do When a Payment Fails
If a donor reports a failed payment, ask them to check the common causes above and try again. If the issue persists they should contact their bank or try a different payment method. If you suspect the issue is with your Stripe account, log in to your Stripe dashboard to check for any notifications or verification requirements.
Managing Your Donors List
Track every donation and receipts in one place.
Reading the Donors List
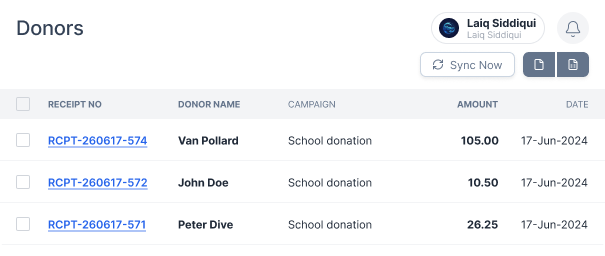
Each row in the list represents a single donation and includes:
- Receipt No — A unique receipt number generated for the transaction.
- Donor Name — The name of the person who made the donation.
- Campaign — Which campaign the donation was made to.
- Amount — The total amount donated, including any tip if applicable.
- Date — The date the donation was made.
Viewing and Resending a Receipt
Click on any Receipt No to generate and view the full donation receipt. The receipt includes the donor’s contact information, campaign details, a breakdown of the payment including any tip amount, and the total amount paid.
📹 Watch: Check the Donors Report ⏱ 29s
If a donor needs a copy of their receipt resent, click Send Receipt in the top right corner of the receipt page. This will email the receipt directly to the donor without you having to recreate it manually.
📹 Watch: Resend Donor Receipt ⏱ 30s
Syncing Donors with Constant Contact
Click Sync Now in the top right corner of the Donors page to sync your donor list with Constant Contact. This keeps your email marketing contacts up to date automatically, so you do not have to manually export and import donor information every time someone gives. Learn how to connect with Constant Contacts.
Exporting Your Donor List
Use the export buttons next to the Sync Now button to download your donor list as a PDF or spreadsheet file for your own records or reporting needs.
Managing Recurring Donations
Keep tabs on every recurring donor with Ideali's Recurring Donations page.
The Recurring Donations page lets you track and manage all donors who have set up an ongoing contribution to your campaigns, whether monthly, weekly, or any other recurring frequency you have configured.To access this page, go to Donation in the left sidebar and click Recurring Donations.
Reading the Recurring Donations List
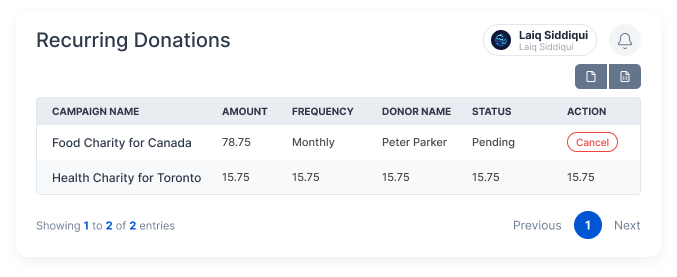
Each row represents a single recurring donation setup and includes:
- Campaign Name — The campaign the recurring donation is tied to.
- Amount — The amount charged on each billing cycle.
- Frequency — How often the donation is charged, such as monthly.
- Donor Name — The name of the donor who set up the recurring contribution.
- Status — The current state of the recurring donation.
📹 Watch: Check Recurring Donations Report ⏱ 26s
Understanding Recurring Donation Statuses
Each recurring donation can have one of the following statuses:
- Processing — The donation is active and being charged successfully on schedule.
- Waiting — The next scheduled charge has not yet been processed.
- Failed — The most recent charge attempt was unsuccessful, often due to a payment issue.
- Cancelled — The recurring donation has been stopped and will no longer be charged.
You can filter the list by any of these statuses using the Filter by Status dropdown at the top of the page to quickly find donations that need attention.
Cancelling a Recurring Donation
If a donor requests to stop their recurring contribution, click Cancel next to their entry in the Action column. Once cancelled, no further charges will be made and the status will update to Cancelled.
Exporting Your Recurring Donations
Use the export buttons in the top right corner of the page to download your recurring donations list as a PDF or spreadsheet for your own records or reporting needs.