

Sub Profiles to Manage Multiple Campaigns
Run separate programs or departments without mixing up your data. Learn how to create sub profiles in Ideali, each with its own campaigns.
Sub Profiles let you manage multiple sets of campaigns, donors, payments, and payment accounts separately within a single Ideali account. This is useful if your organization runs distinct programs, departments, or events that you want to keep organized and reported on independently.
What Are Sub Profiles?
A sub profile acts like its own workspace within your account. Each sub profile has its own:
- Campaigns — Donation campaigns created under that sub profile.
- Donors — A donor list specific to that sub profile’s campaigns.
- Payments — Payment records tracked separately from your other profiles.
- Payment Accounts — Its own connected payment account for receiving funds.
Your main account remains the Default profile, marked with a Parent tag, and you can create as many sub profiles underneath it as you need.
Creating a Sub Profile
- Click your profile menu in the top right corner of the dashboard.
- Select Switch Sub Profile.
- Click Create Sub Profile at the bottom of the list.
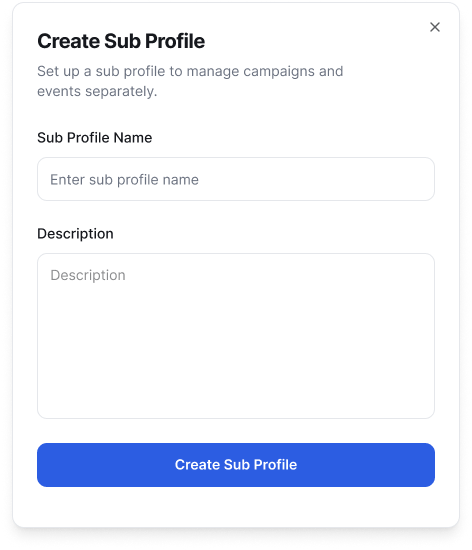
- Enter a Sub Profile Name and an optional Description.
- Click Create Sub Profile to finish.
Switching Between Profiles
To move between your different sub profiles, click your profile menu in the top right corner and select Switch Sub Profile. You will see a list of all your sub profiles along with the Default profile at the top. Click any profile in the list to switch into it.
Editing a Sub Profile
Click the pencil icon next to any sub profile in the list to update its name or description.
Setting Up Roles & Users
Control exactly what each team member can see and do in your Ideali account. Learn how to create custom roles with specific permissions.
Creating a New Role
- Go to the Roles tab.
- Click Create New Role.
- Enter a Role Name, for example “Content Manager.”
- Optionally add a Description to clarify what the role is for.
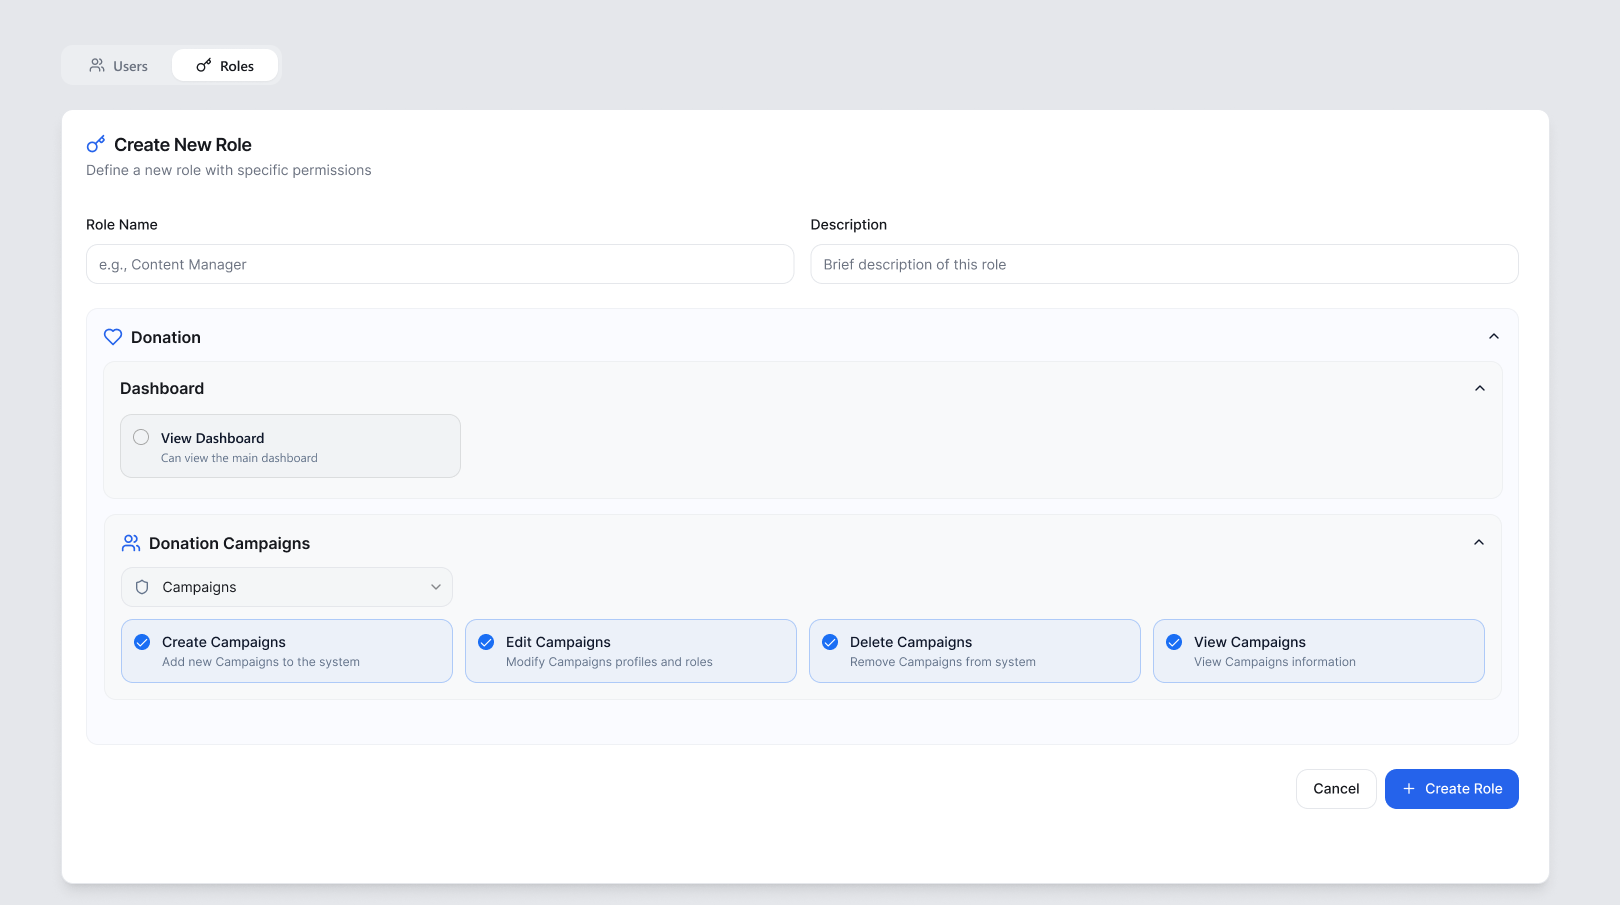
- Select the permissions you want to grant this role from the list below.
- Click Create Role to save it.
You can also click Select All at the top of the permissions list to quickly grant full access if you are creating an admin level role.
Understanding Permission Categories
Permissions are organized into sections that mirror the structure of your Ideali account. Each section can be expanded to reveal specific actions you can allow or restrict:
- Dashboard — Controls whether the role can view the donation dashboard.
- Donation — Covers Campaigns, Invoices, Donors, Recurring Donations, Archived Campaigns, and Email Snippets. Includes actions such as Create, Edit, Delete, Archive, Export, View, View Detail, View Embedded Code, View QR Code, Send, Sync, and CreateSyncList depending on the section.
- SubProfile — Controls whether the role can create, edit, or switch between sub profiles.
- Connector — Covers Integrations and Invoice syncing, including creating integrations, viewing integration sync provider lists, and syncing with QuickBooks.
- Discount — Covers Coupon management including Create, Edit, Delete, and View for discount coupons.
- Membership — Covers membership Email Snippets including Create, Edit, Delete, and View.
- PaymentAccount — Covers Archive, Create, Edit, and View for payment accounts.
Each permission includes a short description beneath it explaining exactly what it allows, so you can fine tune access down to a specific action such as exporting a list versus simply viewing it.
Editing or Removing a Role
From the Roles tab you can update an existing role’s permissions at any time or remove a role that is no longer needed. Changes to a role automatically apply to every user currently assigned to it.
Adding a New User
- Go to the Users tab.
- Click Add User.
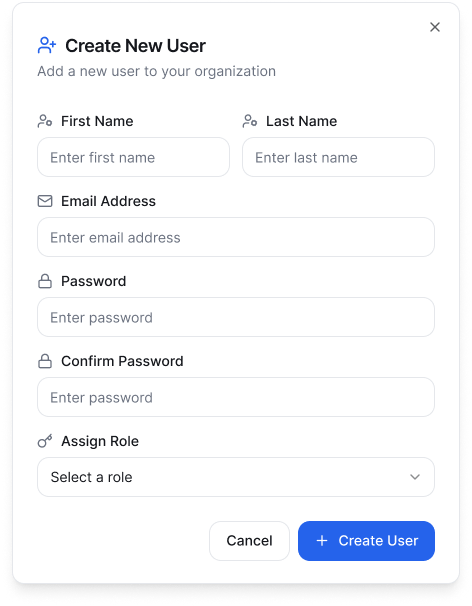
- Enter the user’s First Name and Last Name.
- Enter their Email Address.
- Set a Password and confirm it.
- Use the Assign Role dropdown to select which role this user should have.
- Click Create User to add them to your organization.
Managing Existing Users
The Users tab lists every member of your organization along with the actions available for each one. From here you can update a user’s details or change their assigned role at any time as your team’s needs evolve.
Securing Your Ideali Account
Protect your account from unauthorized access.
Two Factor Authentication
Two factor authentication, or 2FA, adds an extra layer of security beyond your password. When enabled, you will be required to enter a verification code sent to your email each time you sign in, in addition to your password.
To enable two factor authentication:
- Go to Settings in the left sidebar and click Profile Settings.
- Find the Two Factor Authentication toggle under Organizer Info.
- Switch the toggle to Enabled.
Once enabled, every time you log in you will receive an email containing a verification code. Enter this code on the sign in screen to complete your login. This ensures that even if someone obtains your password, they cannot access your account without also having access to your email.
Login Notifications
Ideali also sends an email notification every time a successful login occurs on your account. This helps you stay aware of account activity at all times. If you ever receive a login notification you do not recognize, you should change your password immediately and review your account for any unauthorized changes.
Best Practices for Account Security
- Enable two factor authentication on your account, especially if you manage payment accounts or sensitive donor information.
- Use a strong, unique password that you do not reuse on other websites.
- Pay attention to login notification emails and act quickly if you notice unfamiliar activity.
- Only assign Admin level roles to team members who genuinely need full account access. Learn more about Roles and Permissions.